Composability Chronicles #1: How to build your Flow NFT for composability
Overview
NFT composability refers to the ability of different Non-Fungible Tokens (NFTs) to be combined, linked, and interact with each other in a meaningful way. This allows NFTs to be used as building blocks to create new and more complex NFTs, or to be integrated into various decentralized applications, marketplaces, games, and platforms.
In this guide, we will walk through the process of building a composable NFT contract. We will cover setting up the development environment, writing the contracts, supporting transactions and scripts, along with how to deploy the contract to testnet. By the end of this guide, you will have a solid understanding of how to build a composable NFT on Flow. This guide will assume that you have a beginner level understanding of cadence.
All of the resulting code from this guide is available here.
Preparation
Before we begin building our composable NFT, we need to set up the development environment.
- To start, download and install the Flow CLI here
- It is highly recommended to go through the basic NFT tutorial here. This is a more advanced one.
- Using git, clone the https://github.com/bshahid331/my-nft-project/tree/skeleton repository as a starting point.
- Navigate to the newly created my-nft-project folder, the my-nft-project folder with a text editor of your choice (i.e. VSCode)
The repo has multiple folder which will provide us with a starting point for all needed boilerplate to build a Flow NFT
/flow.json- Configuration file to help manage local, testnet, and mainnet flow deployments of contracts from the/cadencefolder/cadence/contracts- Smart contracts that can be deployed to the Flow chain/transactions- Transactions that can perform changes to data on the Flow blockchain/scripts- Scripts that can provide read-only access to data on the Flow blockchain
Standard Contracts
The starter code includes important standard contracts that we will use to build our NFT. Make sure you add them to your project in the contracts
The contracts are:
FungibleToken.cdc- This is a standard Flow smart contract that represents Fungible TokensNonFungibleToken.cdc- This is a standard Flow smart contract that represents NFTs. We will use this to implement our custom NFTMetadataViews.cdc- This contract is used to make our NFT interoperable. We will implement the metadata views specified in this contract so any Dapp can interact with our NFT!
Basic NFT Setup
Let’s start with a basic NFT
- Let’s create a new file called
MyFunNFT.cdc
_138import NonFungibleToken from "./NonFungibleToken.cdc"_138_138pub contract MyFunNFT: NonFungibleToken {_138_138 pub event ContractInitialized()_138 pub event Withdraw(id: UInt64, from: Address?)_138 pub event Deposit(id: UInt64, to: Address?)_138 pub event Minted(id: UInt64, editionID: UInt64, serialNumber: UInt64)_138 pub event Burned(id: UInt64)_138_138 pub let CollectionStoragePath: StoragePath_138 pub let CollectionPublicPath: PublicPath_138 pub let CollectionPrivatePath: PrivatePath_138_138 /// The total number of NFTs that have been minted._138 ///_138 pub var totalSupply: UInt64_138_138 pub resource NFT: NonFungibleToken.INFT {_138_138 pub let id: UInt64_138_138 init(_138 ) {_138 self.id = self.uuid_138 }_138_138 destroy() {_138 MyFunNFT.totalSupply = MyFunNFT.totalSupply - (1 as UInt64)_138_138 emit Burned(id: self.id)_138 }_138 }_138_138_138 pub resource interface MyFunNFTCollectionPublic {_138 pub fun deposit(token: @NonFungibleToken.NFT)_138 pub fun getIDs(): [UInt64]_138 pub fun borrowNFT(id: UInt64): &NonFungibleToken.NFT_138 pub fun borrowMyFunNFT(id: UInt64): &MyFunNFT.NFT? {_138 post {_138 (result == nil) || (result?.id == id):_138 "Cannot borrow MyFunNFT reference: The ID of the returned reference is incorrect"_138 }_138 }_138 }_138_138 pub resource Collection: MyFunNFTCollectionPublic, NonFungibleToken.Provider, NonFungibleToken.Receiver, NonFungibleToken.CollectionPublic {_138_138 /// A dictionary of all NFTs in this collection indexed by ID._138 ///_138 pub var ownedNFTs: @{UInt64: NonFungibleToken.NFT}_138_138 init () {_138 self.ownedNFTs <- {}_138 }_138_138 /// Remove an NFT from the collection and move it to the caller._138 ///_138 pub fun withdraw(withdrawID: UInt64): @NonFungibleToken.NFT {_138 let token <- self.ownedNFTs.remove(key: withdrawID)_138 ?? panic("Requested NFT to withdraw does not exist in this collection")_138_138 emit Withdraw(id: token.id, from: self.owner?.address)_138_138 return <- token_138 }_138_138 /// Deposit an NFT into this collection._138 ///_138 pub fun deposit(token: @NonFungibleToken.NFT) {_138 let token <- token as! @MyFunNFT.NFT_138_138 let id: UInt64 = token.id_138_138 // add the new token to the dictionary which removes the old one_138 let oldToken <- self.ownedNFTs[id] <- token_138_138 emit Deposit(id: id, to: self.owner?.address)_138_138 destroy oldToken_138 }_138_138 /// Return an array of the NFT IDs in this collection._138 ///_138 pub fun getIDs(): [UInt64] {_138 return self.ownedNFTs.keys_138 }_138_138 /// Return a reference to an NFT in this collection._138 ///_138 /// This function panics if the NFT does not exist in this collection._138 ///_138 pub fun borrowNFT(id: UInt64): &NonFungibleToken.NFT {_138 return (&self.ownedNFTs[id] as &NonFungibleToken.NFT?)!_138 }_138_138 /// Return a reference to an NFT in this collection_138 /// typed as MyFunNFT.NFT._138 ///_138 /// This function returns nil if the NFT does not exist in this collection._138 ///_138 pub fun borrowMyFunNFT(id: UInt64): &MyFunNFT.NFT? {_138 if self.ownedNFTs[id] != nil {_138 let ref = (&self.ownedNFTs[id] as auth &NonFungibleToken.NFT?)!_138 return ref as! &MyFunNFT.NFT_138 }_138_138 return nil_138 }_138_138 destroy() {_138 destroy self.ownedNFTs_138 }_138 }_138_138 pub fun mintNFT(): @MyFunNFT.NFT {_138 let nft <- create MyFunNFT.NFT()_138_138 MyFunNFT.totalSupply = MyFunNFT.totalSupply + (1 as UInt64)_138_138 return <- nft_138 }_138_138 pub fun createEmptyCollection(): @NonFungibleToken.Collection {_138 return <- create Collection()_138 }_138_138 init() {_138 self.CollectionPublicPath = PublicPath(identifier: "MyFunNFT_Collection")!_138 self.CollectionStoragePath = StoragePath(identifier: "MyFunNFT_Collection")!_138 self.CollectionPrivatePath = PrivatePath(identifier: "MyFunNFT_Collection")!_138_138 self.totalSupply = 0_138_138 emit ContractInitialized()_138 }_138}
This code implements a fundamental flow of Non-Fungible Tokens (NFTs) by extending the NonFungibleToken.INFT resource and a basic collection through MyFunNFTCollectionPublic. The program includes essential events that can be emitted, global variables that determine the storage paths of NFTs in a user's account, and a public mint function to create NFTs. It is worth noting that public minting is typically reserved for distributing free NFTs, while minting for profit requires an admin or the integration of a payment mechanism within the function.
Although this is commendable progress, the current NFT implementation lacks data. To remedy this, we can introduce customizable data fields for each NFT. For instance, in this use case, we aim to incorporate editions, each with a unique name, description, and serial number, much like the TopShot platform
Firstly, we will introduce two global variables at the top of the code, alongside totalSupply:
_10pub var totalEditions: UInt64_10_10access(self) let editions: {UInt64: Edition}
We need to update the init() function for this contract. Add
_10self.totalEditions = 0_10self.editions = {}
Should look like this
_12init() {_12 self.CollectionPublicPath = PublicPath(identifier: "MyFunNFT_Collection")!_12 self.CollectionStoragePath = StoragePath(identifier: "MyFunNFT_Collection")!_12 self.CollectionPrivatePath = PrivatePath(identifier: "MyFunNFT_Collection")!_12_12 self.totalSupply = 0_12 self.totalEditions = 0_12_12 self.editions = {}_12_12 emit ContractInitialized()_12 }
These variables will facilitate monitoring the overall count of editions and accessing a specific edition through its assigned identifier. The editionsdictionary will provide a means to extract particular information for each edition. Consequently, we will proceed to construct the Editionstruct that we refer to within our editionsobject.
_47pub struct Edition {_47_47 pub let id: UInt64_47_47 /// The number of NFTs minted in this edition._47 ///_47 /// This field is incremented each time a new NFT is minted._47 ///_47 pub var size: UInt64_47_47 /// The number of NFTs in this edition that have been burned._47 ///_47 /// This field is incremented each time an NFT is burned._47 ///_47 pub var burned: UInt64_47_47 pub fun supply(): UInt64 {_47 return self.size - self.burned_47 }_47_47 /// The metadata for this edition._47 pub let metadata: Metadata_47_47 init(_47 id: UInt64,_47 metadata: Metadata_47 ) {_47 self.id = id_47 self.metadata = metadata_47_47 self.size = 0_47 self.burned = 0_47_47 }_47_47 /// Increment the size of this edition._47 ///_47 access(contract) fun incrementSize() {_47 self.size = self.size + (1 as UInt64)_47 }_47_47 /// Increment the burn count for this edition._47 ///_47 access(contract) fun incrementBurned() {_47 self.burned = self.burned + (1 as UInt64)_47 }_47 }
This is a fundamental struct that we will employ to represent "Editions" within this NFT. It retains an id, the size, the burned count, and a bespoke Metadataobject defined below. Please include this struct in your code as well.
_13pub struct Metadata {_13_13 pub let name: String_13 pub let description: String_13_13 init(_13 name: String,_13 description: String_13 ) {_13 self.name = name_13 self.description = description_13 }_13}
To maintain simplicity, the Metadatain this instance consists solely of a name and a description. However, if necessary, you may include more complex data within this object
We will now proceed to modify the NFT resource to include additional fields that allow us to track which "edition" each NFT belongs to and its serial number. We will be storing this information in the NFT resource. Following are the steps to accomplish this:
Add the following fields below id in the NFT resource:
_10pub let editionID: UInt64_10pub let serialNumber: UInt64
Update the init() function in the NFT resource:
_10init(_10 editionID: UInt64,_10 serialNumber: UInt64_10 ) {_10 self.id = self.uuid_10 self.editionID = editionID_10 self.serialNumber = serialNumber_10 }
Update the mintNFT() function to adhere to the new init() and the Edition struct:
_18pub fun mintNFT(editionID: UInt64): @MyFunNFT.NFT {_18 let edition = MyFunNFT.editions[editionID]_18 ?? panic("edition does not exist")_18_18 // Increase the edition size by one_18 edition.incrementSize()_18_18 let nft <- create MyFunNFT.NFT(editionID: editionID, serialNumber: edition.size)_18_18 emit Minted(id: nft.id, editionID: editionID, serialNumber: edition.size)_18_18 // Save the updated edition_18 MyFunNFT.editions[editionID] = edition_18_18 MyFunNFT.totalSupply = MyFunNFT.totalSupply + (1 as UInt64)_18_18 return <- nft_18}
The updated mintNFT()function now receives an edition ID for the NFT to be minted. It validates the ID and creates the NFT by incrementing the serial number. It then updates the global variables to reflect the new size and returns the new NFT.
Excellent progress! We can now mint new NFTs for a specific edition. However, we need to enable the creation of new editions. To accomplish this, we will add function that allows anyone to create an edition (although in a real-world scenario, this would typically be a capability reserved for admin-level users). Please note that for the purposes of this example, we will make this function public.
_28_28pub fun createEdition(_28 name: String,_28 description: String,_28 ): UInt64 {_28 let metadata = Metadata(_28 name: name,_28 description: description,_28 )_28_28 MyFunNFT.totalEditions = MyFunNFT.totalEditions + (1 as UInt64)_28_28 let edition = Edition(_28 id: MyFunNFT.totalEditions,_28 metadata: metadata_28 )_28_28 // Save the edition_28 MyFunNFT.editions[edition.id] = edition_28_28 emit EditionCreated(edition: edition)_28_28 return edition.id_28}_28_28pub fun getEdition(id: UInt64): Edition? {_28 return MyFunNFT.editions[id]_28}
followed by adding the getEdition helper method.
Let’s also add the new event:
_10pub event ContractInitialized()_10pub event Withdraw(id: UInt64, from: Address?)_10pub event Deposit(id: UInt64, to: Address?)_10pub event Minted(id: UInt64, editionID: UInt64, serialNumber: UInt64)_10pub event Burned(id: UInt64)_10pub event EditionCreated(edition: Edition)
Your NFT should look something like this:
_250import NonFungibleToken from "./NonFungibleToken.cdc"_250_250pub contract MyFunNFT: NonFungibleToken {_250_250 pub event ContractInitialized()_250 pub event Withdraw(id: UInt64, from: Address?)_250 pub event Deposit(id: UInt64, to: Address?)_250 pub event Minted(id: UInt64, editionID: UInt64, serialNumber: UInt64)_250 pub event Burned(id: UInt64)_250 pub event EditionCreated(edition: Edition)_250_250 pub let CollectionStoragePath: StoragePath_250 pub let CollectionPublicPath: PublicPath_250 pub let CollectionPrivatePath: PrivatePath_250_250 /// The total number of NFTs that have been minted._250 ///_250 pub var totalSupply: UInt64_250_250 pub var totalEditions: UInt64_250_250 access(self) let editions: {UInt64: Edition}_250_250 pub struct Metadata {_250_250 pub let name: String_250 pub let description: String_250_250 init(_250 name: String,_250 description: String_250 ) {_250 self.name = name_250 self.description = description_250 }_250 }_250_250 pub struct Edition {_250_250 pub let id: UInt64_250_250 /// The number of NFTs minted in this edition._250 ///_250 /// This field is incremented each time a new NFT is minted._250 ///_250 pub var size: UInt64_250_250 /// The number of NFTs in this edition that have been burned._250 ///_250 /// This field is incremented each time an NFT is burned._250 ///_250 pub var burned: UInt64_250_250 pub fun supply(): UInt64 {_250 return self.size - self.burned_250 }_250_250 /// The metadata for this edition._250 pub let metadata: Metadata_250_250 init(_250 id: UInt64,_250 metadata: Metadata_250 ) {_250 self.id = id_250 self.metadata = metadata_250_250 self.size = 0_250 self.burned = 0_250_250 }_250_250 /// Increment the size of this edition._250 ///_250 access(contract) fun incrementSize() {_250 self.size = self.size + (1 as UInt64)_250 }_250_250 /// Increment the burn count for this edition._250 ///_250 access(contract) fun incrementBurned() {_250 self.burned = self.burned + (1 as UInt64)_250 }_250 }_250_250 pub resource NFT: NonFungibleToken.INFT {_250_250 pub let id: UInt64_250_250 pub let editionID: UInt64_250 pub let serialNumber: UInt64_250_250 init(_250 editionID: UInt64,_250 serialNumber: UInt64_250 ) {_250 self.id = self.uuid_250 self.editionID = editionID_250 self.serialNumber = serialNumber_250 }_250_250 destroy() {_250 MyFunNFT.totalSupply = MyFunNFT.totalSupply - (1 as UInt64)_250_250 emit Burned(id: self.id)_250 }_250 }_250_250_250 pub resource interface MyFunNFTCollectionPublic {_250 pub fun deposit(token: @NonFungibleToken.NFT)_250 pub fun getIDs(): [UInt64]_250 pub fun borrowNFT(id: UInt64): &NonFungibleToken.NFT_250 pub fun borrowMyFunNFT(id: UInt64): &MyFunNFT.NFT? {_250 post {_250 (result == nil) || (result?.id == id):_250 "Cannot borrow MyFunNFT reference: The ID of the returned reference is incorrect"_250 }_250 }_250 }_250_250 pub resource Collection: MyFunNFTCollectionPublic, NonFungibleToken.Provider, NonFungibleToken.Receiver, NonFungibleToken.CollectionPublic {_250_250 /// A dictionary of all NFTs in this collection indexed by ID._250 ///_250 pub var ownedNFTs: @{UInt64: NonFungibleToken.NFT}_250_250 init () {_250 self.ownedNFTs <- {}_250 }_250_250 /// Remove an NFT from the collection and move it to the caller._250 ///_250 pub fun withdraw(withdrawID: UInt64): @NonFungibleToken.NFT {_250 let token <- self.ownedNFTs.remove(key: withdrawID)_250 ?? panic("Requested NFT to withdraw does not exist in this collection")_250_250 emit Withdraw(id: token.id, from: self.owner?.address)_250_250 return <- token_250 }_250_250 /// Deposit an NFT into this collection._250 ///_250 pub fun deposit(token: @NonFungibleToken.NFT) {_250 let token <- token as! @MyFunNFT.NFT_250_250 let id: UInt64 = token.id_250_250 // add the new token to the dictionary which removes the old one_250 let oldToken <- self.ownedNFTs[id] <- token_250_250 emit Deposit(id: id, to: self.owner?.address)_250_250 destroy oldToken_250 }_250_250 /// Return an array of the NFT IDs in this collection._250 ///_250 pub fun getIDs(): [UInt64] {_250 return self.ownedNFTs.keys_250 }_250_250 /// Return a reference to an NFT in this collection._250 ///_250 /// This function panics if the NFT does not exist in this collection._250 ///_250 pub fun borrowNFT(id: UInt64): &NonFungibleToken.NFT {_250 return (&self.ownedNFTs[id] as &NonFungibleToken.NFT?)!_250 }_250_250 /// Return a reference to an NFT in this collection_250 /// typed as MyFunNFT.NFT._250 ///_250 /// This function returns nil if the NFT does not exist in this collection._250 ///_250 pub fun borrowMyFunNFT(id: UInt64): &MyFunNFT.NFT? {_250 if self.ownedNFTs[id] != nil {_250 let ref = (&self.ownedNFTs[id] as auth &NonFungibleToken.NFT?)!_250 return ref as! &MyFunNFT.NFT_250 }_250_250 return nil_250 }_250_250 destroy() {_250 destroy self.ownedNFTs_250 }_250 }_250_250 pub fun createEdition(_250 name: String,_250 description: String,_250 ): UInt64 {_250 let metadata = Metadata(_250 name: name,_250 description: description,_250 )_250_250 MyFunNFT.totalEditions = MyFunNFT.totalEditions + (1 as UInt64)_250_250 let edition = Edition(_250 id: MyFunNFT.totalEditions,_250 metadata: metadata_250 )_250_250 // Save the edition_250 MyFunNFT.editions[edition.id] = edition_250_250 emit EditionCreated(edition: edition)_250_250 return edition.id_250 }_250_250 pub fun mintNFT(editionID: UInt64): @MyFunNFT.NFT {_250 let edition = MyFunNFT.editions[editionID]_250 ?? panic("edition does not exist")_250_250 // Increase the edition size by one_250 edition.incrementSize()_250_250 let nft <- create MyFunNFT.NFT(editionID: editionID, serialNumber: edition.size)_250_250 emit Minted(id: nft.id, editionID: editionID, serialNumber: edition.size)_250_250 // Save the updated edition_250 MyFunNFT.editions[editionID] = edition_250_250 MyFunNFT.totalSupply = MyFunNFT.totalSupply + (1 as UInt64)_250_250 return <- nft_250 }_250_250 pub fun createEmptyCollection(): @NonFungibleToken.Collection {_250 return <- create Collection()_250 }_250_250 init() {_250 self.CollectionPublicPath = PublicPath(identifier: "MyFunNFT_Collection")!_250 self.CollectionStoragePath = StoragePath(identifier: "MyFunNFT_Collection")!_250 self.CollectionPrivatePath = PrivatePath(identifier: "MyFunNFT_Collection")!_250_250 self.totalSupply = 0_250 self.totalEditions = 0_250_250 self.editions = {}_250_250 emit ContractInitialized()_250 }_250}
Adding Transactions
Now that we have the contract we need to create transactions that can be called to call the functions createEdition and mintNFT. These transactions can be called by any wallet since the methods are public on the contract.
Create these in your transactions folder.
-
createEdition.cdc_14import MyFunNFT from "../contracts/MyFunNFT.cdc"_14_14transaction(_14name: String,_14description: String,_14) {_14_14prepare(signer: AuthAccount) {_14}_14_14execute {_14MyFunNFT.createEdition(name: name, description: description)_14}_14}This transaction takes in a name and description and creates a new edition with it.
-
mintNFT.cdc_31import MyFunNFT from "../contracts/MyFunNFT.cdc"_31import MetadataViews from "../contracts/MetadataViews.cdc"_31import NonFungibleToken from "../contracts/NonFungibleToken.cdc"_31_31transaction(_31editionID: UInt64,_31) {_31let MyFunNFTCollection: &MyFunNFT.Collection{MyFunNFT.MyFunNFTCollectionPublic,NonFungibleToken.CollectionPublic,NonFungibleToken.Receiver,MetadataViews.ResolverCollection}_31_31prepare(signer: AuthAccount) {_31if signer.borrow<&MyFunNFT.Collection>(from: MyFunNFT.CollectionStoragePath) == nil {_31// Create a new empty collection_31let collection <- MyFunNFT.createEmptyCollection()_31_31// save it to the account_31signer.save(<-collection, to: MyFunNFT.CollectionStoragePath)_31_31// create a public capability for the collection_31signer.link<&{NonFungibleToken.CollectionPublic, MyFunNFT.MyFunNFTCollectionPublic, MetadataViews.ResolverCollection}>(_31MyFunNFT.CollectionPublicPath,_31target: MyFunNFT.CollectionStoragePath_31)_31}_31self.MyFunNFTCollection = signer.borrow<&MyFunNFT.Collection{MyFunNFT.MyFunNFTCollectionPublic,NonFungibleToken.CollectionPublic,NonFungibleToken.Receiver,MetadataViews.ResolverCollection}>(from: MyFunNFT.CollectionStoragePath)!_31}_31_31execute {_31let item <- MyFunNFT.mintNFT(editionID: editionID)_31self.MyFunNFTCollection.deposit(token: <-item)_31}_31}
This transaction verifies whether a MyFunNFT collection exists for the user by checking the presence of a setup. If no such collection is found, the transaction sets it up. Subsequently, the transaction mints a new NFT and deposits it in the user's collection.
Interoperability
We have successfully implemented a simple Edition NFT and created transactions to create editions and mint NFTs. However, in order for other applications to build on top of or interface with our NFT, they would need to know that our NFT contains a Metadataobject with a nameand descriptionfield. Additionally, it is important to consider how each app would keep track of the individual metadata and its structure for each NFT, especially given that different developers may choose to implement metadata in entirely different ways.
In Cadence, MetadataViewsserve as a standardized way of accessing NFT metadata, regardless of the specific metadata implementation used in the NFT resource. By providing a consistent interface for accessing metadata, MetadataViewsenable developers to build applications that can work with any NFT that uses a MetadataViews, regardless of how that metadata is structured.
By using MetadataViews, we can facilitate interoperability between different applications and services that use NFTs, and ensure that the metadata associated with our NFTs can be easily accessed and used by other developers.
Now let’s unlock interoperability for our NFT…
Let’s start off by importing the MetadataViews contract to the top
import MetadataViews from "./MetadataViews.cdc”
Now we need to have our NFT resource extend the MetadataViews.Resolver interface.
pub resource NFT: NonFungibleToken.INFT, MetadataViews.Resolver
Now we must implement getViews and resolveView. The function getViews tells anyone which views this NFT supports and resolveView takes in a view type and returns the view itself. Some common views are:
ExternalURL - A website / link for an NFT
NFT Collection Data - Data on how to setup this NFT collection in a users account
Display View - How to display this NFT on a website
Royalties View - Any royalties that should be adhered to for a marketplace transaction
NFT Collection Display View - How to display the NFT collection on a website
Let’s add the following getViews implementation to our NFT resource.
_13pub fun getViews(): [Type] {_13 let views = [_13 Type<MetadataViews.Display>(),_13 Type<MetadataViews.ExternalURL>(),_13 Type<MetadataViews.NFTCollectionDisplay>(),_13 Type<MetadataViews.NFTCollectionData>(),_13 Type<MetadataViews.Royalties>(),_13 Type<MetadataViews.Edition>(),_13 Type<MetadataViews.Serial>()_13 ]_13_13 return views_13 }
These function helps inform what specific views this NFT supports. In the same NFT resource add the following method:
_22pub fun resolveView(_ view: Type): AnyStruct? {_22 let edition = self.getEdition()_22_22 switch view {_22 case Type<MetadataViews.Display>():_22 return self.resolveDisplay(edition.metadata)_22 case Type<MetadataViews.ExternalURL>():_22 return self.resolveExternalURL()_22 case Type<MetadataViews.NFTCollectionDisplay>():_22 return self.resolveNFTCollectionDisplay()_22 case Type<MetadataViews.NFTCollectionData>():_22 return self.resolveNFTCollectionData()_22 case Type<MetadataViews.Royalties>():_22 return self.resolveRoyalties()_22 case Type<MetadataViews.Edition>():_22 return self.resolveEditionView(serialNumber: self.serialNumber, size: edition.size)_22 case Type<MetadataViews.Serial>():_22 return self.resolveSerialView(serialNumber: self.serialNumber)_22 }_22_22 return nil_22 }
Now lets go over each individual helper function that you should add to your NFT resource
_10pub fun resolveDisplay(_ metadata: Metadata): MetadataViews.Display {_10 return MetadataViews.Display(_10 name: metadata.name,_10 description: metadata.description,_10 thumbnail: MetadataViews.HTTPFile(url: "https://upload.wikimedia.org/wikipedia/commons/thumb/e/ec/Mona_Lisa%2C_by_Leonardo_da_Vinci%2C_from_C2RMF_retouched.jpg/1200px-Mona_Lisa%2C_by_Leonardo_da_Vinci%2C_from_C2RMF_retouched.jpg"),_10 )_10 }
1. This creates a display view and takes in the edition data to populate the name and description. I included a dummy image but you would want to include a unique thumbnail
_10pub fun resolveExternalURL(): MetadataViews.ExternalURL {_10 let collectionURL = "www.flow-nft-catalog.com"_10 return MetadataViews.ExternalURL(collectionURL)_10}
2. This is a link for the NFT. I’m putting in a placeholder site for now but this would be something for a specific NFT not an entire collection. So something like www.collection_site/nft_id
_15pub fun resolveNFTCollectionDisplay(): MetadataViews.NFTCollectionDisplay {_15 let media = MetadataViews.Media(_15 file: MetadataViews.HTTPFile(url: "https://assets-global.website-files.com/5f734f4dbd95382f4fdfa0ea/63ce603ae36f46f6bb67e51e_flow-logo.svg"),_15 mediaType: "image"_15 )_15_15 return MetadataViews.NFTCollectionDisplay(_15 name: "MyFunNFT",_15 description: "The open interopable NFT",_15 externalURL: MetadataViews.ExternalURL("www.flow-nft-catalog.com"),_15 squareImage: media,_15 bannerImage: media,_15 socials: {}_15 )_15}
3. This is a view that indicates to apps on how to display information about the collection. The externalURL here would be the website for the entire collection. I have linked a temporary flow image but you could many image you want here.
_13pub fun resolveNFTCollectionData(): MetadataViews.NFTCollectionData {_13 return MetadataViews.NFTCollectionData(_13 storagePath: MyFunNFT.CollectionStoragePath,_13 publicPath: MyFunNFT.CollectionPublicPath,_13 providerPath: MyFunNFT.CollectionPrivatePath,_13 publicCollection: Type<&MyFunNFT.Collection{MyFunNFT.MyFunNFTCollectionPublic}>(),_13 publicLinkedType: Type<&MyFunNFT.Collection{MyFunNFT.MyFunNFTCollectionPublic, NonFungibleToken.CollectionPublic, NonFungibleToken.Receiver, MetadataViews.ResolverCollection}>(),_13 providerLinkedType: Type<&MyFunNFT.Collection{MyFunNFT.MyFunNFTCollectionPublic, NonFungibleToken.CollectionPublic, NonFungibleToken.Provider, MetadataViews.ResolverCollection}>(),_13 createEmptyCollectionFunction: (fun (): @NonFungibleToken.Collection {_13 return <-MyFunNFT.createEmptyCollection()_13 })_13 )_13}
4. This is a view that allows any Flow Dapps to have the information needed to setup a collection in any users account to support this NFT.
_10pub fun resolveRoyalties(): MetadataViews.Royalties {_10 return MetadataViews.Royalties([])_10}
5. For now we will skip Royalties but here you can specify which addresses should receive royalties and how much.
_11pub fun resolveEditionView(serialNumber: UInt64, size: UInt64): MetadataViews.Edition {_11 return MetadataViews.Edition(_11 name: "Edition",_11 number: serialNumber,_11 max: size_11 )_11}_11_11pub fun resolveSerialView(serialNumber: UInt64): MetadataViews.Serial {_11 return MetadataViews.Serial(serialNumber)_11}
6. These are some extra views we can support since this NFT has editions and serial numbers. Not all NFTs need to support this but it’s nice to have for our case.
Lastly we need our Collection resource to support MetadataViews.ResolverCollection
_10pub resource Collection: MyFunNFTCollectionPublic, NonFungibleToken.Provider, NonFungibleToken.Receiver, NonFungibleToken.CollectionPublic, MetadataViews.ResolverCollection
You should see an error that you need to implement borrowViewResolver. This is a method a Dapp can use on the collection to borrow an NFT that inherits to the MetadataViews.Resolver interface so that resolveView that we implemented earlier can be called.
_10pub fun borrowViewResolver(id: UInt64): &AnyResource{MetadataViews.Resolver} {_10 let nft = (&self.ownedNFTs[id] as auth &NonFungibleToken.NFT?)!_10 let nftRef = nft as! &MyFunNFT.NFT_10 return nftRef as &AnyResource{MetadataViews.Resolver}_10 }
Now your NFT is interoperable!
Your final NFT contract should look something like this.
Deploying the Project
Creating a sample testnet account
We will need an account to deploy the contract with. To set one up visit: https://testnet-faucet.onflow.org/.
Run flow keys generate and paste your public key on the site. Keep your private key handy for the future. I just created the account 0x503b9841a6e501eb on testnet.
Configuration
Deploying this on testnet is simple. We need to populate our config file with the relevant contracts and there addresses as well as where we want to deploy any new contracts.
Copy and replace your flow.json with the following:
_54{_54 "contracts": {_54 "NonFungibleToken": {_54 "source": "./cadence/contracts/NonFungibleToken.cdc",_54 "aliases": {_54 "testnet": "0x631e88ae7f1d7c20",_54 "mainnet": "0x1d7e57aa55817448"_54 }_54 },_54 "MetadataViews": {_54 "source": "./cadence/contracts/MetadataViews.cdc",_54 "aliases": {_54 "testnet": "0x631e88ae7f1d7c20",_54 "mainnet": "0x1d7e57aa55817448"_54 }_54 },_54 "FungibleToken": {_54 "source": "./cadence/contracts/FungibleToken.cdc",_54 "aliases": {_54 "emulator": "0xee82856bf20e2aa6",_54 "testnet": "0x9a0766d93b6608b7",_54 "mainnet": "0xf233dcee88fe0abe"_54 }_54 },_54 "MyFunNFT": "./cadence/contracts/MyFunNFT.cdc"_54 },_54 "networks": {_54 "emulator": "127.0.0.1:3569",_54 "mainnet": "access.mainnet.nodes.onflow.org:9000",_54 "testnet": "access.devnet.nodes.onflow.org:9000"_54 },_54 "accounts": {_54 "emulator-account": {_54 "address": "f8d6e0586b0a20c7",_54 "key": "6d12eebfef9866c9b6fa92b97c6e705c26a1785b1e7944da701fc545a51d4673"_54 },_54 "testnet-account": {_54 "address": "0x503b9841a6e501eb",_54 "key": "$MYFUNNFT_TESTNET_PRIVATEKEY"_54 }_54 },_54 "deployments": {_54 "emulator": {_54 "emulator-account": [_54 "NonFungibleToken",_54 "MetadataViews",_54 "MyFunNFT"_54 ]_54 },_54 "testnet": {_54 "testnet-account": ["MyFunNFT"]_54 }_54 }_54}
This is a file that is meant to be pushed so we don’t want to expose our private keys. Luckily we can reference environment variables so use the following command to update the "$MYFUNNFT_TESTNET_PRIVATEKEY" environment variable with your newly created private key.
export MYFUNNFT_TESTNET_PRIVATEKEY=<YOUR_PRIVATE_KEY_HERE>
This is telling Flow where to find the contracts NonFungibleToken, MetadataViews, FungibleToken. For MyFunNFT it’s specifying where to deploy it, being testnet-account. Run flow project deploy --network=testnet and your contract should be deployed on testnet!
You can see mine here: https://flow-view-source.com/testnet/account/0x503b9841a6e501eb/contract/MyFunNFT.
Creating and minting an NFT
Let’s mint an NFT to an account. We will run the transactions from before. I’m using my testnet blocto wallet with the address: 0xf5e9719fa6bba61a. The newly minted NFT will go into this account.
Check out these links to see what I ran.
Adding the NFT collection to the Catalog
Now that we have minted some NFTs into an account and made our NFT interoperable let’s add it to the NFT catalog.
What is the Flow NFT Catalog?
The Flow NFT Catalog is a repository of NFT’s on Flow that adhere to the Metadata standard and implement at least the core views. The core views being
External URL
NFT Collection Data
NFT Collection Display
Display
Royalties
When proposing an NFT to the catalog, it will make sure you have implemented these views correctly. Once added your NFT will easily be discoverable and other ecosystem developers can feel confident that your NFT has implemented the core views and build on top of your NFT using the Metadata views we implemented earlier!
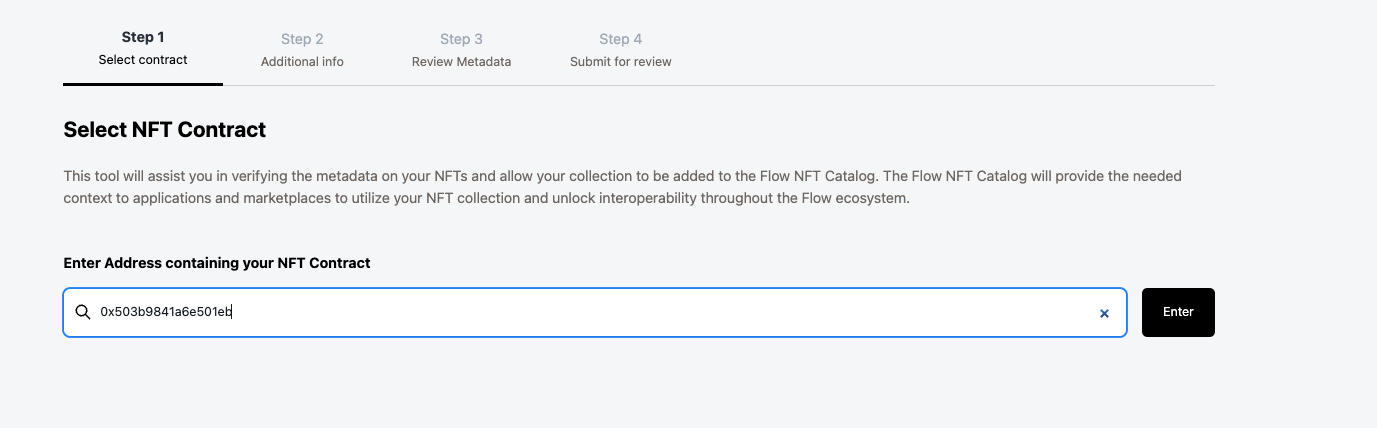
Now go to www.flow-nft-catalog.com and click “Add NFT Collection”
1. It starts off by asking for the NFT contract. This is where the contract is deployed so what is in your flow.json and what we created via the faucet.
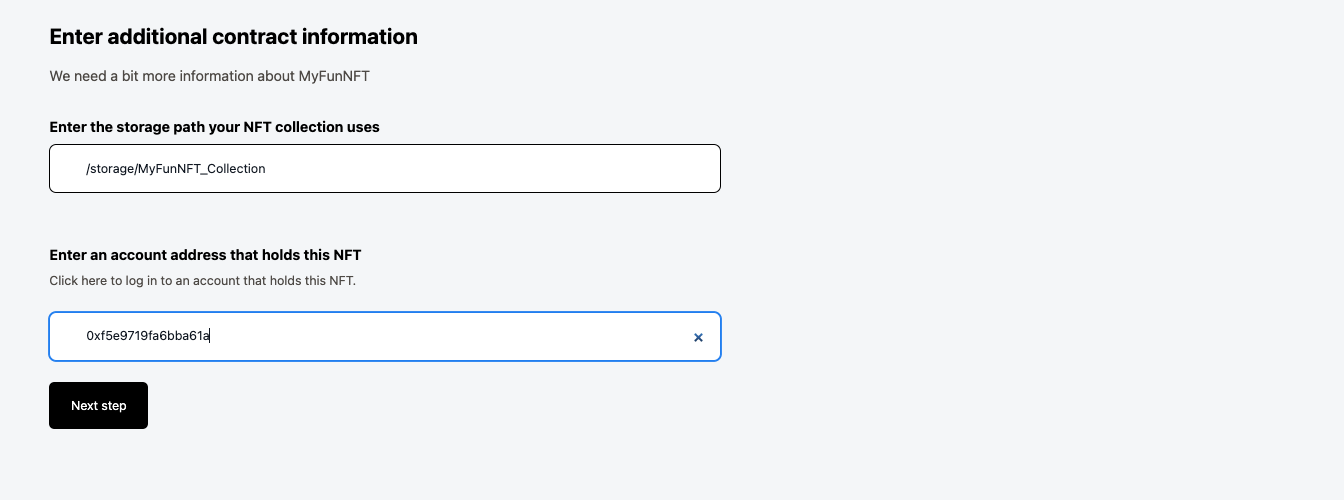
2. Now we need to enter the storage path. In our NFT it is /storage/MyFunNFT_Collection as well as an account that holds the NFT. This is 0xf5e9719fa6bba61a for me.
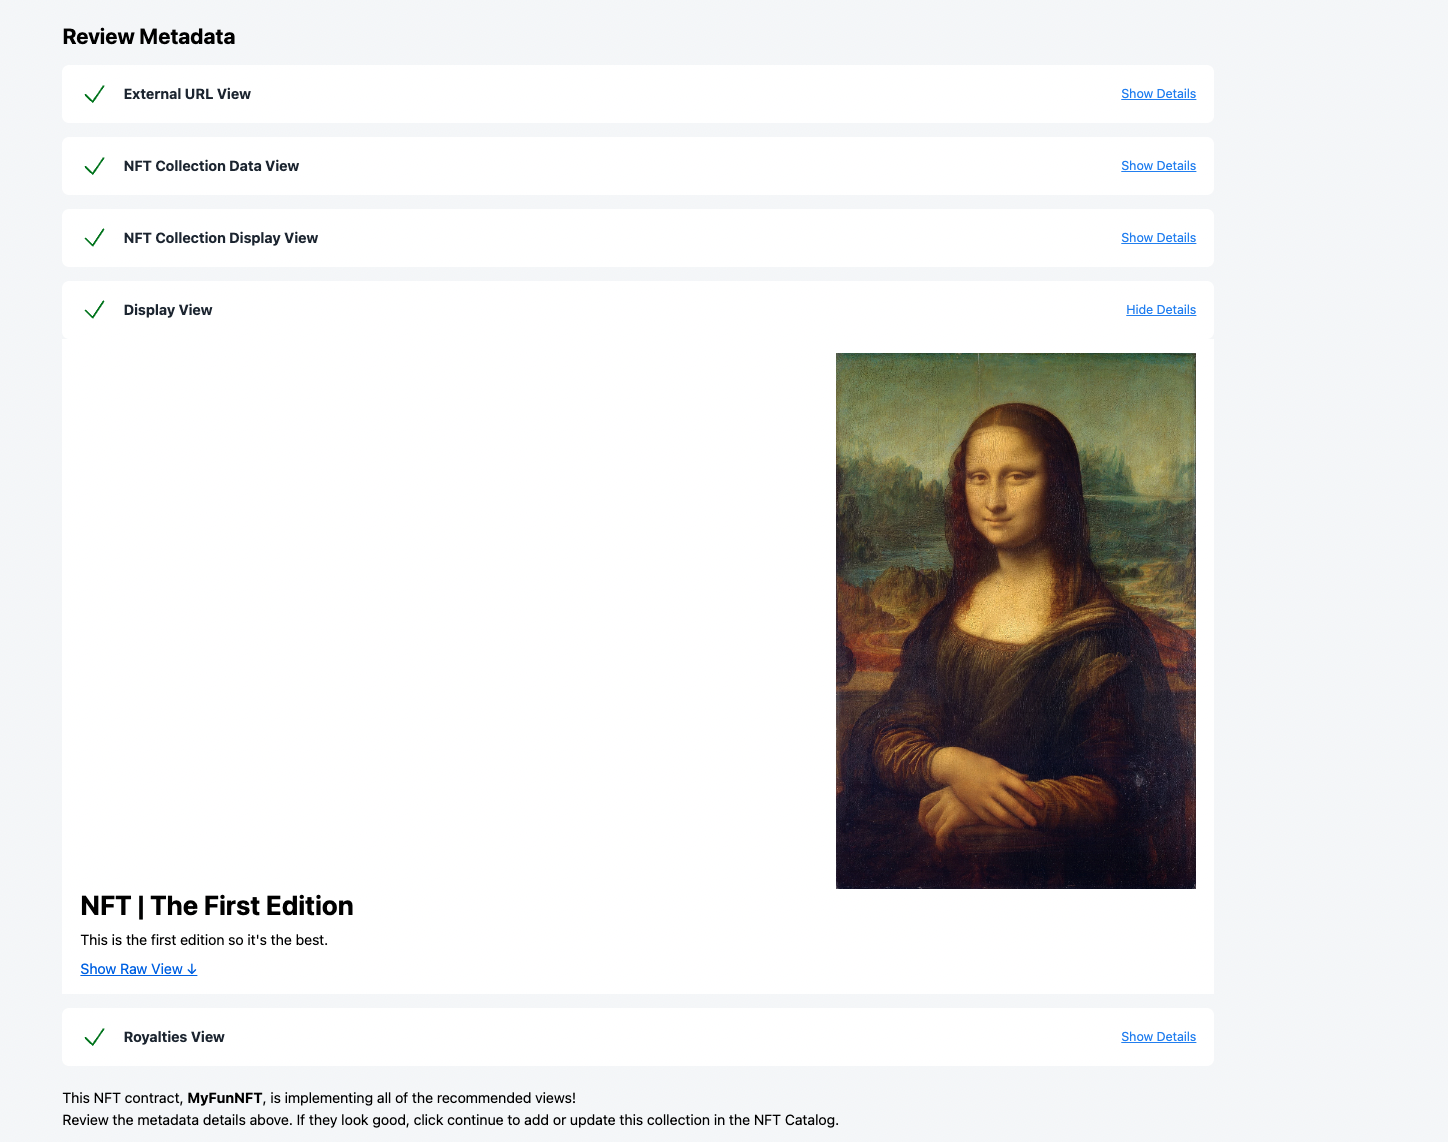
3. Now you should screen that verifies that you have implemented the “core” nft views correctly and you can also see the actual data being returned from the chain.
In the last step you can submit your collection to the NFT catalog and voila, you have created an NFT on Flow that can easily be discovered and supported on any Dapp in the Flow ecosystem!
Conclusion
In this tutorial, we created a basic NFT that supports multiple editions and unlimited serials. Each edition has a name and description and each NFT has a unique serial belonging to a specific Edition. We then made our NFT interoperable by implementing MetadataViews. We minted an NFT and added our NFT collection to the catalog so it’s easily discoverable and ready to be built on top of!
Final version of the code.